Please Note: This article is written for users of the following Microsoft Word versions: 97, 2000, 2002, and 2003. If you are using a later version (Word 2007 or later), this tip may not work for you. For a version of this tip written specifically for later versions of Word, click here: Rotating a Drawing Object.
Written by Allen Wyatt (last updated January 26, 2019)
This tip applies to Word 97, 2000, 2002, and 2003
Word allows you to create drawing objects in your document. These objects (such as an oval, rectangle, line, or AutoShape) are positioned on what is termed the "drawing layer," which is separate and distinct from the text that appears in a document. You generally create such objects by using the tools on the drawing toolbar.
You can rotate a drawing object to any degree you desire. Simply follow these steps:
If you know exactly how much you want to rotate the drawing object, you can also do the following:
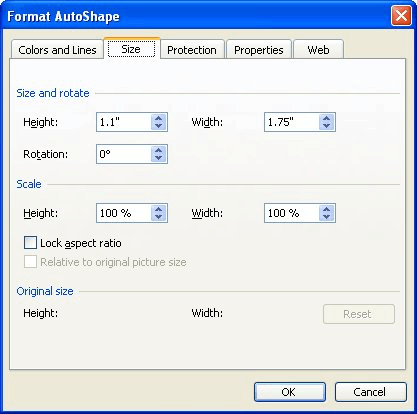
Figure 1. The Size tab of the Format AutoShape dialog box.
You should note that Word allows you to insert text within an AutoShape. Rotating the AutoShape, however, does not result in the text within the AutoShape being rotated. Instead, you can only change the orientation of the text within the AutoShape, as described in other WordTips.
WordTips is your source for cost-effective Microsoft Word training. (Microsoft Word is the most popular word processing software in the world.) This tip (1726) applies to Microsoft Word 97, 2000, 2002, and 2003. You can find a version of this tip for the ribbon interface of Word (Word 2007 and later) here: Rotating a Drawing Object.

Create Custom Apps with VBA! Discover how to extend the capabilities of Office 365 applications with VBA programming. Written in clear terms and understandable language, the book includes systematic tutorials and contains both intermediate and advanced content for experienced VB developers. Designed to be comprehensive, the book addresses not just one Office application, but the entire Office suite. Check out Mastering VBA for Microsoft Office 365 today!
Ever want to expand the mail merge feature to include graphics? Merging graphics into your document is easy but requires ...
Discover MoreRotating graphics in Word is not always straight-forward, but it can be done. The tools on the Drawing toolbar allow you ...
Discover MoreWant a graphic to appear at a precise place on the page? It's easy to gain control by following the steps in this tip.
Discover MoreFREE SERVICE: Get tips like this every week in WordTips, a free productivity newsletter. Enter your address and click "Subscribe."
There are currently no comments for this tip. (Be the first to leave your comment—just use the simple form above!)
Got a version of Word that uses the menu interface (Word 97, Word 2000, Word 2002, or Word 2003)? This site is for you! If you use a later version of Word, visit our WordTips site focusing on the ribbon interface.
Visit the WordTips channel on YouTube

FREE SERVICE: Get tips like this every week in WordTips, a free productivity newsletter. Enter your address and click "Subscribe."
Copyright © 2026 Sharon Parq Associates, Inc.
 Please Note:
This article is written for users of the following Microsoft Word versions: 97, 2000, 2002, and 2003. If you are using a later version (Word 2007 or later), this tip may not work for you. For a version of this tip written specifically for later versions of Word, click here:
Please Note:
This article is written for users of the following Microsoft Word versions: 97, 2000, 2002, and 2003. If you are using a later version (Word 2007 or later), this tip may not work for you. For a version of this tip written specifically for later versions of Word, click here:
Comments